
Publishing at GitHub Pages with Pelican and Travis-CI
Published on
First published at: df.python.org.br/blog/github-pages-com-pelican-e-travis-ci
I’m making this post to help everyone who want to create their first website at GitHub Pages using Pelican to create the pages and Travis-CI to automate the task of static page generation and publishing.
This guide assumes that the reader have an account at GitHub and Travis-CI and have familiarity with the Python environment. The version of Pelican used at this post was 3.6.
GitHub Pages
GitHub Pages is a feature of GitHub that enables its users to host static content (html, css, js and images) and publish on a github.io subdomain or even to assign it to a custom domain.
Briefly there are two ways to create a page at gh pages:
1 - User/Organization page
To create this type of page you need to create a repository with the name username.github.io where the username is your GitHub account username or the organization handle where the repository will be created:
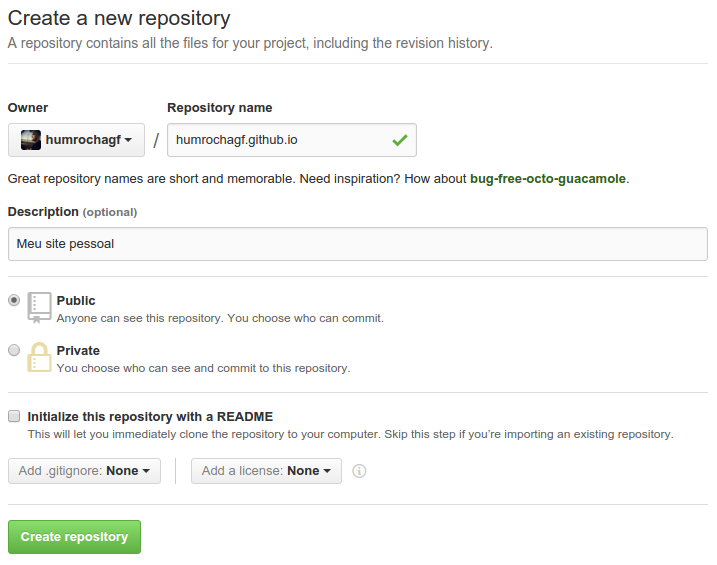
The content to be published needs to be placed at the master branch and the Pelican files at the pelican branch.
2 - Project page
On this kind of page create a repository with the name myproject where myproject is the name that you what your project to be called at username.github.io:
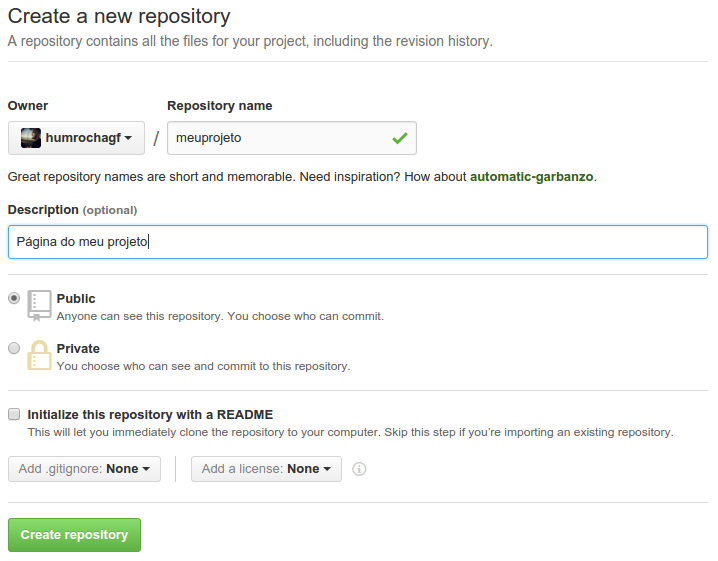
The content to be published must be placed at gh-pages branch and the Pelican files at pelican branch.
To get more info go to the GitHub Pages official website.
Pelican
Pelican is a static website generator for blog creation. Here I will demonstrate the default pelican blog creation following the user/organization page path stopping only to point some difference from the project page path.
To install pelican run the command:
$ pip install pelican==3.6
To create a pelican project run the command:
$ mkdir humrochagf.github.io
$ cd humrochagf.github.io
$ pelican-quickstart
Welcome to pelican-quickstart v3.6.3.

This script will help you create a new Pelican-based website.

Please answer the following questions so this script can generate the files
needed by Pelican.


> Where do you want to create your new web site? [.]
> What will be the title of this web site? Meu Blog
> Who will be the author of this web site? Humberto Rocha
> What will be the default language of this web site? [en] pt
> Do you want to specify a URL prefix? e.g., http://example.com   (Y/n) n
> Do you want to enable article pagination? (Y/n) y
> How many articles per page do you want? [10]
> What is your time zone? [Europe/Paris] America/Sao_Paulo
> Do you want to generate a Fabfile/Makefile to automate generation and publishing? (Y/n) y
> Do you want an auto-reload & simpleHTTP script to assist with theme and site development? (Y/n) y
> Do you want to upload your website using FTP? (y/N) n
> Do you want to upload your website using SSH? (y/N) n
> Do you want to upload your website using Dropbox? (y/N) n
> Do you want to upload your website using S3? (y/N) n
> Do you want to upload your website using Rackspace Cloud Files? (y/N) n
> Do you want to upload your website using GitHub Pages? (y/N) y
> Is this your personal page (username.github.io)? (y/N) y
Done. Your new project is available at /path/to/humrochagf.github.io
Start a repository at this directory and push the data to the pelican branch:
$ git init
$ git remote add origin git@github.com:humrochagf/humrochagf.github.io.git
$ git checkout -b pelican
$ git add .
$ git commit -m 'Starting pelican branch'
$ git push origin pelican
To publish the content at the master bransh we need the ghp-import module:
$ pip install ghp-import
$ echo 'pelican==3.6\nghp-import' > requirements.txt
$ git add requirements.txt
$ git commit -m 'Adding requirements'
$ git push origin pelican
Publishing the blog:
$ make github
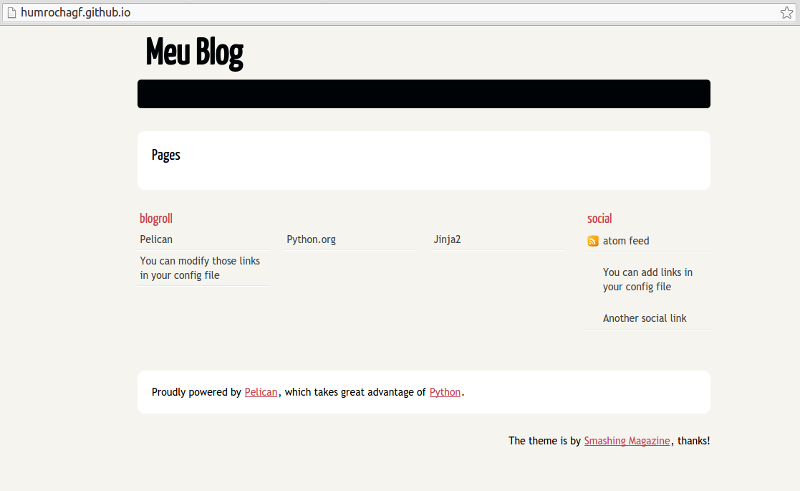
Now that we have the blog up and running at gh pages lets automate the task of static pages generation to update the blog content with new posts without needing to be on a machine with the pelican environment installed.
Travis-CI
Travis-CI is a Continuous Integration platform that mounts and tests projects that are hosted on github and will be your tool to automate the publishing process of the blog.
The first thing to be done is to go at Travis-CI to enable your repository.

After that go to the repository settings at Travis-CI and disable the Build pull requests option to keep your blog from being updated when someone opens a pull request and enable the Build only if .travis.yml is present option to alloy only the branch that has this file to trigger the build.

The next step is to create a Deploy Key to enable Travis-CI to publish the content at GitHub after finishing the build and to do that you must create a ssh key at the root of your local repository:
$ ssh-keygen -f publish-key
Generating public/private rsa key pair.
Enter passphrase (empty for no passphrase):
Enter same passphrase again:
Your identification has been saved in publish-key.
Your public key has been saved in publish-key.pub.
With the key let’s cipher it using a tool called Travis-CLI (certifique-se de que esteja instalada em sua máquina) to publish safely at the repository without exposing the content of the private key:
$ travis encrypt-file publish-key
Detected repository as humrochagf/humrochagf.github.io, is this correct? |yes| yes
encrypting publish-key for humrochagf/humrochagf.github.io
storing result as publish-key.enc
storing secure env variables for decryption

Please add the following to your build script (before_install stage in your .travis.yml, for instance):

    openssl aes-256-cbc -K $encrypted_591fe46d4973_key -iv $encrypted_591fe46d4973_iv -in publish-key.enc -out publish-key -d

Pro Tip: You can add it automatically by running with --add.

Make sure to add publish-key.enc to the git repository.
Make sure not to add publish-key to the git repository.
Commit all changes to your .travis.yml.
Like sad before at the command output we can add an option --add to add the content right to .travis.yml file although, to keep us from overriding some command that already exists at the file I recommend to add manually.
In our case we will create the file:
$ touch .travis.yml
And add the following content:
sudo: false
branches:
  only:
  - pelican
language: python
before_install:
# change the line bellow with the output of the command:
# travis encrypt-file publish-key
# but keep the final part:
# -out ~/.ssh/publish-key -d
- openssl aes-256-cbc -K $encrypted_591fe46d4973_key -iv $encrypted_591fe46d4973_iv -in publish-key.enc -out ~/.ssh/publish-key -d
- chmod u=rw,og= ~/.ssh/publish-key
- echo "Host github.com" >> ~/.ssh/config
- echo "  IdentityFile ~/.ssh/publish-key" >> ~/.ssh/config
# replace git@github.com:humrochagf/humrochagf.github.io.git
# for the ssh access of your repository
- git remote set-url origin git@github.com:humrochagf/humrochagf.github.io.git
# If you are following the project page path change master:master
# with gh-pages:gh-pages
- git fetch origin -f master:master
install:
- pip install --upgrade pip
- pip install -r requirements.txt
script:
- make github
Remove the non encrypted private key to prevent us from publishing it at the repo:
$ rm publish-key
Now we add the files to the repo:
$ git add .travis.yml publish-key.enc
$ git commit -m 'Adding Travis-CI files'
$ git push origin pelican
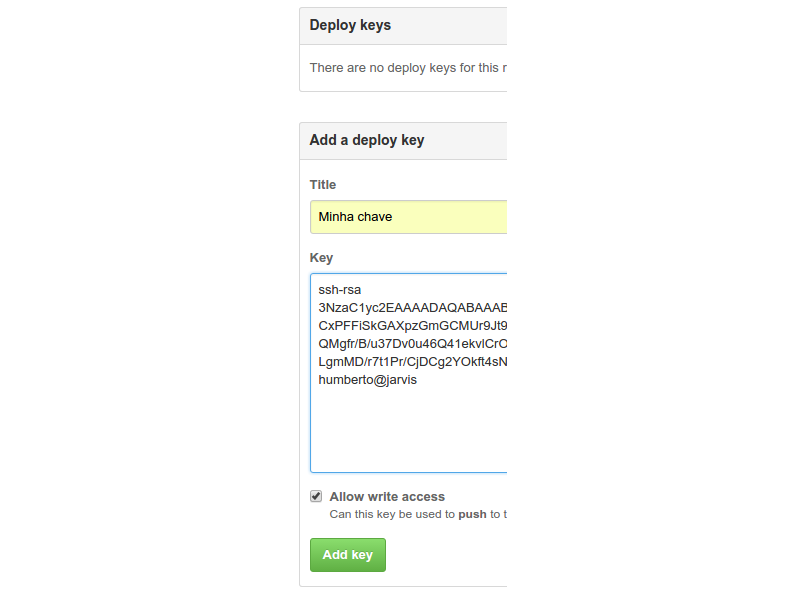
To enable Travis-CI access we add the deploy key on GitHub using the content of the public key publish-key.pub:
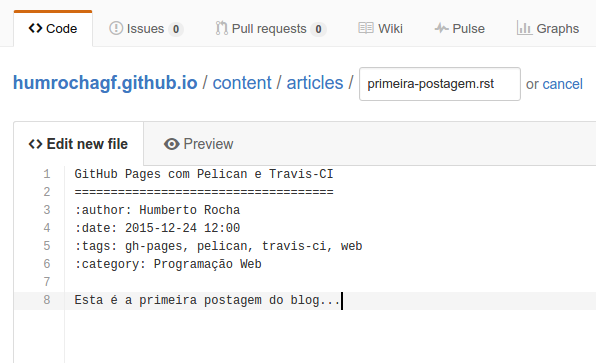
Done, now we can publish content at our blog without the need of having Pelican installed at our machine:
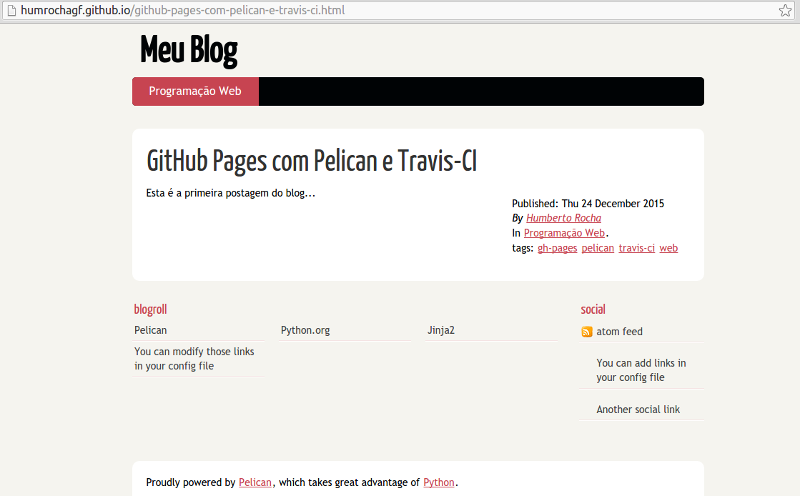
Travis-CI will publish the post for you:
If you liked and want to see it running you can go to the Brazilian community page to check out the code at https://github.com/pythonbrasil/wiki.

This work is licensed under a Creative Commons Attribuition-ShareAlike 4.0 International License .