Exploring pygame 2 - Drawing on Screen
Published on
During a game lifetime, we are constantly drawing on the screen. Now that we learned how to create a program with pygame it’s time to start to draw.
Drawing axis
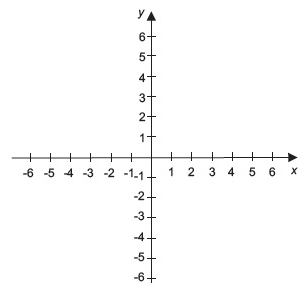
Going back to math classes at high school we were introduced to the Cartesian coordinate system. It is basically one bidimensional plane oriented by the axis x and y where the x values grow from left to right while y grows from bottom to top:
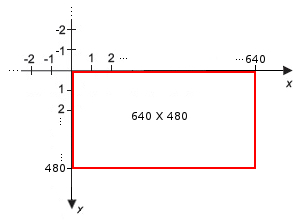
At pygame there’s a little change, the drawing space will use the coordinates x and y too but the y axis will follow the opposite direction from the cartesian coordinate system, y will grow from top to bottom and the visible area of the screen will be located starting from the point x=0 and y=0 as the top left corner of your program window going until the size defined at the command pygame.display.set_mode((x, y)):
Let’s Draw!
Start by creating a file draw.py with the following content:
| |
The program starts by defining the values of the colors that will be used later. Following it initializes pygame like at the previous post and then it loads the font at pygame.font.SysFont to be ready to use later.
After filling the screen surface with the black color some of the drawing functions available at pygame.draw are used:
- line: draws a line receiving as parameters the surface following by its color, a list with the starting and the end coordinates, and the line thickness in pixels.
- rect: draws a rectangle receiving as parameters the surface following by its color and a list with the starting x position, starting y position, width, and height.
- ellipse: draws a circumference receiving as parameters the surface following by its color and a list with the same structure of rect.
- polygon: draws a polygon receiving as parameters the surface following by its color and a list with the coordinates from the polygon vertices.
After that pygame.display.flip() refreshes the entire drawing area of the surface screen, following by an interval of 5 seconds.
After the sleep it fills the surface with black and the text that will be written is defined using the font.render method where the first parameter is the string pygame, then the value True that activate the anti-alias that smooths the text, and as third parameter white as the color of the font. This method creates an intermediary surface with the text that will be passed to the screen surface with the method blit that receives as parameter the surface that will be copied and its position at the surface screen.
And at the end, the screen refresh is called followed by a 5 seconds sleep and the program is done.
Conclusion
There are many ways to draw on the screen with pygame, you can see the other methods with details from the library documentation.
The code of this chapter can be found at the repo exploring-pygame.

This work is licensed under a Creative Commons Attribuition-ShareAlike 4.0 International License .