
Exploring pygame 1 - Discovering the library
Published on
Game development is one of the most common reasons to start to study programming. With me it was not different, despite not following the game developer path, this was always a field that caught my attention.
I’m creating this series of posts to learn more about the game development basics and to share my discoveries with everyone. I’ll use the pygame library as tool and I will start by the most basic principles of game development until the creation of a single player pong like game.
To reach this goal I’ll start with Structured Programming focused at the basics of game development and pygame to make it more comfortable for beginners. As the series goes I’ll refactor the code to introduce Object Oriented Programming concepts.
The code used on this series will be running at Python 3
Pygame
Pygame is a set of Python modules designed to make games. It uses SDL which is a cross-platform library that abstracts the multimedia components of a computer as audio and video and allows an easier development of programs that uses this resources.
Installation
Before starting the installation process you must have python installed at your system. In case you don’t have it check this installation guide first.
The pygame installation itself can be different from an OS and can be checked for more details at its [official install guide](http://www.pygame.org/wiki/GettingStarted#Pygame Installation).
But, to install it into a Debian based system such as Ubuntu you must first make sure its dependencies are installed:
$ sudo apt-get build-dep python-pygame
After that install pygame at your virtualenv:
$ pip install pygame
Or system wide:
$ sudo pip install pygame
Hello World
As usual, when we are learning something new in programming we start as small as possible to check it everything is working properly before proceeding with the studies.
To make that let’s create a file called hello.py with the following content:
| |
Then we just need to run it:
$ python hello.py
So the result will be this:
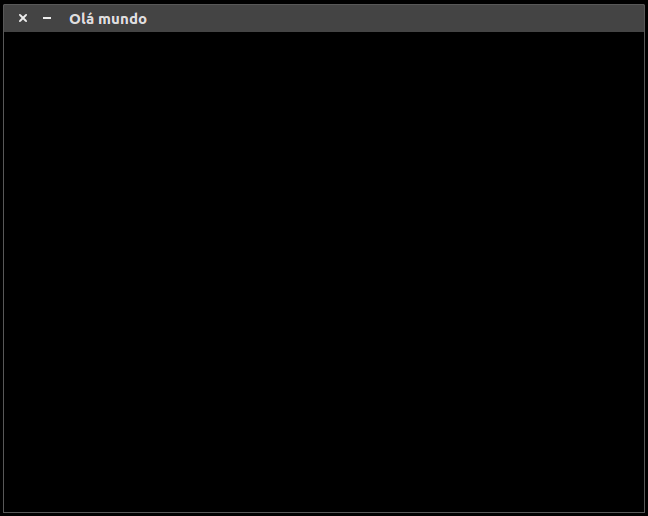
It’s still far from a game, but we can see some basic concepts to be discussed.
The three first lines are common to the most programs written in python. At the first line, we define the file encoding used by the python interpreter which was utf-8. This line is most common at codes written in python 2 that has non ASCII characters, if you are using python 3 you probably won’t use it because utf-8 is the default encoding already. The second and third code lines are importing the python libraries that will be responsible for all the magic.
The command pygame.init() starts all modules that need initialization inside pygame.
At pygame.display.set_mode we create an area for the game window at the size of 640x480 pixels, followed by pygame.display.set_caption were we set the value “Hello World” to our window title.
With the window created we can use the command fill from screen to fill it with the black color. The colors are passed on a list of three elements that represent the values from RGB. Each value can go from 0 to 255. You can change the values to see by yourself the window changing its color.
The command pygame.display.flip represents an important concept to pygame and game development itself. When we use commands to draw at the screen, we are actually drawing a virtual surface at the memory that represents a portion of our actual screen. To make that drawing visible to the user we need to send it to the actual screen, and we do it in these two separate steps to prevent from displaying incomplete frames to the user. It is like drawing at a board and then “flipping it” to people see what we drew.
And then, to finish the command sleep from the library time makes the program to wait 5 seconds before finish the execution. Otherwise, the program would close before we see the result.
Conclusion
Now we finish our first chapter by presenting the library and writing our first program. The code of it can be checked at this repositóry: exploring-pygame.
We meet again at the nexts chapters were we will describe the base concepts of game development inside pygame.

This work is licensed under a Creative Commons Attribuition-ShareAlike 4.0 International License .